
Ever wondered what it took to build a lean-to greenhouse from materials you already have? Maybe you have a stash of old windows that you’ve been collecting, or maybe some wood lying around that could be repurposed for framing. Or, maybe it’s just a dream in your head that you would love to execute someday! Today I’m going to show you lots of photos of our progress on our homestead’s lean-to greenhouse! It is far from finished, but I will show you where we are at with it! (Full transparency- this will probably be a 2-3 part series over the next year! So, here is part 1.)


This is a post that I have been dying to share. It feels important because the birth of this idea set the tone for the entire piece of our property that we own. If you know our story (or if you don’t- go check out my About section for our story!), you know that we live on a 20 acre property with some of our dearest friends, the Sekuras family! We each have around 10 acres, and all of us from the start felt a lot of stress about what to do with the land. It was a good kind of stress! But, the pressing feeling of holding something so beautiful and rich, and wanting to maximize every piece of it for the good of our families and our community. It is such a beautiful thing, but at the same time holds a lot of weight.
How did the greenhouse idea begin?
When we first moved in, we had a friend run his horses out here for about 4-5 months to see if we enjoyed having animals on the property. Those horses were hilarious and wild! We loved getting to know all 10 of them over the course of that time. In that time, it solidified one thought factor for our family- we love animals, but! We want to use the land as a growing medium rather than have it’s sole purpose be for animals.
Everyone’s homestead is different- the layout, the tone of the land, the amount of wood/pasture, the drainage, the water access, etc. We quickly realized that we had two really good factors that could be valuable for growing things- wide open pasture and running water (via creek!). This was in the back of our heads when we were diligently trying to figure out how we wanted to use the land.

This post contains affiliate links, which means I make a small commission at no extra cost to you
I was only a few weeks postpartum, when Ian came upon a Facebook Market listing for three gigantic sets of windows. They were coming off of an old mobile home, and the double paned glass was in great condition. I just remember him exclaiming- “I’ve got it. I know what we are going to do with the land.” I leaned in to see what he had found, and then he began to rattle off all the dreams that would soon lay the groundwork for- a flower farm.
Finding the Windows
Those windows were a pivotal point- we realized that we could transform the side of our 20 stall horse stable into a functioning lean-to greenhouse. We could use that greenhouse to start flowers from seed, and build a business based in our community that could really impact others. I was a little doubtful at first- we had only ever grown vegetables (with plant starts from Lowes) in a garden. I had never been good at keeping plants alive, let alone know how to start a flower farm. But, with any good story, there is always a beginning. I was ready to jump in.

Ian went out, measured the side of the barn, and we realized that the height and width were going to be perfect for this space. We were just so excited. It was as if God was just opening those door wide, and we were ready to pursue a new business venture. He went and picked up the windows, and I began to do heavy research into what it would take to get a flower farm up and running. At this point, we were in March or April of 2021. Knowing what I know now- that is the time that most people are starting their seeds and have their gardens already planned out. I was in the throws of postpartum depression with two kids under 2 years old, and it felt extremely overwhelming. Yet, I pushed through those feelings of overwhelm, and just kept taking baby steps forward with research.
Getting Together Supplies
- Windows (old or new!)
- A Door (we Facebook Marketplaced ours! Or, check out your local Habitat for Humanity)
- Polycarbonate Roofing Panels
- 24 in. Horizontal Plastic Closure Strips
- Metal Roofing Screws
- Vinyl Cutting Circular Saw Blade
- Other building/framing tools like a drill and a circular saw
Disclaimer- this post is not meant to be a how-to DIY guide, so I will not be walking through the details of how to build everything. Just will be documenting our experience for inspiration!
Before I knew it, I had watched so many cut-flower farm YouTube videos! I instantly had a cart full of seeds from Johnny Seeds, and I felt like I was starting something very exciting. I started with basic, easy flowers like zinnias, cosmos, and sunflowers- that’s it! Once they came in the mail, it all started to feel very real.
I quickly realized that I had my seeds, but… no greenhouse. After some research, I realized that the greenhouse would be a next-year-thing. We had to start the seeds outdoors since we were after our last frost date. It definitely took the pressure off of finishing the greenhouse quickly! But I still had the itch to get started. We finally had a weekend (May 2021) to get started on it, and here are some of those first photos!


The Demo Phase
After having the time set aside, Ian went inside the barn stall to start the demo. We ripped off all of the plywood walls, to expose the framing. This was a lot of work during a very hot part of the year. After the siding was off, Ian had to measure the window and frame within the framing to custom fit that window into the framing that was already present.
We also measured the old door we would be using, to make sure that the framing fit that too. It’s all just a big puzzle honestly! But having all of your supplies before you begin really helps with the framework. Once I could see the framing and the walls were down, I could envision the greenhouse so much better! We took the siding off the exterior of the barn, and then also off the “divider” of the stall to open it up into a two room greenhouse. We decided to leave the framing up in the middle to grow vines or hang plants from it!


Framing the Greenhouse
After we demoed- it was time to frame! Honestly this all took a few weeks to accomplish. I wish we could’ve just knocked it out in a weekend, but that was pretty unrealistic with two small children under two. I was very thankful to have help from my mom to watch them during all of this, because demolition would not have been easy with a one year old and a 4 month old!
Here are some visuals for the framing process! It felt exciting to just be able to visualize where the door and windows would all go. It also helps to know if you need more materials like windows or siding.


After we measured and made sure it would all fit, it was time to bust out the rest of the framing and rebuild it to fit the window and door!


And that was just the front of the greenhouse! We repeated all of these steps for the side of it in the weeks to come. After the framing and windows were installed- it was time for a roof! I actually don’t have photos of this process- I was keeping the kids busy in the house while Ian knocked that part out.
In the materials listed above, you will want to check out that polycarbonate roofing panel for your greenhouse roofing! There is also a PVC version of this that is slightly less expensive, but the polycarbonate holds up more overtime and does not turn color as quickly as the PVC version because it is better quality. Just do your research, and see what would work best for you! We ended up using some of the “roofing panels” as side panels where we wanted light to come through, see the photos below!


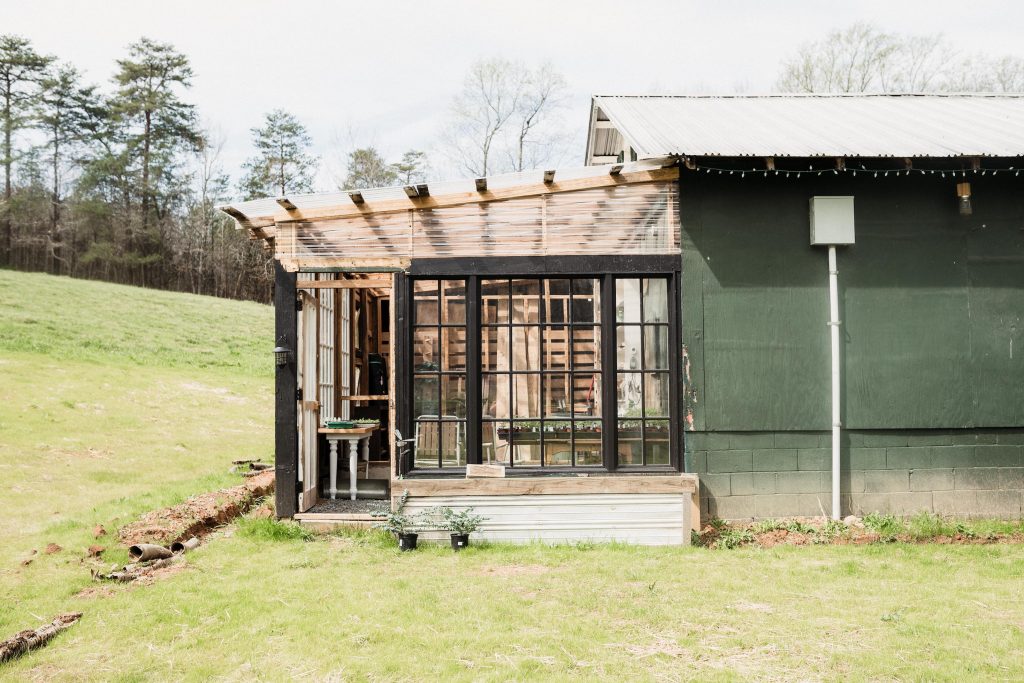
After the windows were up and framed, it was time to think about the exterior! Top on my list were painting the window frames black, and building out a cute little raised bed for the front.

Lean-to Greenhouse Exterior
This is the part where things got really fun! I pulled up a photo of the space on my iPad through the procreate app, and drew up my ideas to see what things would look like visually. I had envisioned a black exterior with a little raised bed under the window. It all turned out better than I had even drew up! I love how it all came together. Here are some photos of the raised bed build and the exterior painting process!

For the raised bed, we wanted to be super resourceful with what we had! We used some old fence posts for the supports, and then framed around it. We actually repurposed the old aluminum roof that was over the greenhouse, and framed around it to make a galvanized front for the raised bed. It’s one of my favorite details on the greenhouse!


Painting the Exterior
I was so nervous to paint the exterior of this beautiful new structure, but in my head, I knew exactly what I wanted it to look like. I just went for it, and I am so glad that I did! Here is a supply list for painting window panes!
- Pressure Washer
- Masking Liquid
- Paint- I chose the color “Caviar Black” by Sherwin Williams
- Ladder
- Paint Brushes
- A flat head razor/scraper and a box cutter


First, you will want to make sure it is all cleaned off and ready to paint. This might be a project for the first day, and then you can come back later after it is dried to start applying the masking liquid. I do recommend the masking liquid, as it was very easy to paint on. What I don’t recommend is doing it on the hottest day of the summer (I painted mine on mid August!). I only got around to painting one window, and the other side sat until I had more motivation in January. It was all masked, but probably shouldn’t have sat that long, so it was harder to get off. My point would be- paint the masking liquid on, and plan to paint relatively soon after!
Once the liquid is on and dried, you can paint right over it! It saved me hours of ripping painters tape and getting that perfect line up. The masking liquid was definitely a time saver! Once you paint, let it dry. Then, come back with a box cutter and slice at the very edge of the window frame. Then, take your scraper and scrape it all away! This process is very time consuming, but it could be done within a weekend. I love how it turned out!
Designing the Interior Layout
After the exterior was complete, it was time to make the inside more functional! And, major disclaimer, this is still in progress! I have a lot of things I want to do inside of the greenhouse, but it will all just take time to complete. We came up with a functional layout for the time being, and I was able to have it ready to go for seed-starting this year! That was a huge blessing. But, here are a few peeks at the inside, and what we have done so far. The photo below is one of my favorite details! A completely second-hand terracotta wall.

My husband actually scored these book shelves off the side of the road from a church! They fit (almost) perfectly, and we just had to make one little adjustment to get them into here. For not actually measuring them beforehand, this was a lucky score! Next, I set out on a mission to collect terracotta pots- all secondhand! We did find a very helpful estate sale with a large stash of the pots, so that helped a lot with sourcing a good chunk of them. But the last few months have been like a treasure hunt, it has been so fun committing to sourcing them second hand!

Venting
We installed a fan to the backside of one of the walls in the greenhouse, and connected it to a thermometer regulator! So, when the thermometer reads “80*F”, it will automatically turn on the fan. This has been such a nice feature, as we don’t quite have it fully vented yet. See the photo below for the fan setup (it’s behind the wire square).
Venting is definitely something you could look into if you have a permanent structure! For now, we just have had to figure out what works for the space. The first thing I do each morning, is get up and go out to open both doors in the greenhouse. This provides ventilation during the day, and when the fan kicks on, having the doors open really helps with temperature control.

Storage
Here is a (messy) angle from the corner that is getting worked on next! I am hoping to install a huge wooden counter and ship lap wall behind it with plenty of storage underneath. It won’t be finished until next season, but that is giving me plenty of time to keep dreaming up ideas for it.

I have a lot of plans for how we will utilize this space for next year. Our farm is only going to keep growing and expanding, so we wanted to take a pause on quickly building out the inside of the greenhouse until we solidified our plans. I found this *free* mint “desk” on Facebook Marketplace, and I was so in love with how it just fit right into this space. It’s actually quite large and has given me a huge space to work on.
I love the drawer aspect for holding all of my labeling supplies and scissors. The other table is also a Marketplace find, just an antique table! Sometimes you just have to work with what you have while your vision is coming to life. And honestly, I wouldn’t have it any other way. The charm and sweetness of having older things in here is so cool. I love the stories behind the pieces, and the way that we are getting to give them even more life in this greenhouse setting.


Climate Control
One thing that I wasn’t aware of prior to owning a greenhouse, is that most greenhouses are not heated. There are some hacks that you can do to offset those cooler night temperatures, but for us, having some reliable heat mats has done the trick. I had those working very hard during the month of February, but come March when the temperatures were leveling out, we didn’t need them as much.

During the month of March, I would go out and turn the heat mats on when I closed up the greenhouse for the night. And in the morning when I got up to open the doors, I would turn them off. The sun is very powerful and can heat up that space so quickly!
You just have to watch and learn. Your environment is most likely much different than mine, and you will have to take that first year as a learning experience. See what works, and see what doesn’t. It has been helpful to take notes for each plant that I’ve been growing, so that next year, we will have even more success. It’s a journey and a process for sure.

…To Be Continued!
This greenhouse already feels so special, and it has been incredibly functional for our family as we started our seeds inside so much earlier than I would have been able to. I have a lot of vision for the interior, and cannot wait to knock out projects inside of it this coming year! Stay tuned for more posts on this powerhouse of a space for our farm. It has been so much fun learning and growing this year.

Do you have a greenhouse? What all are you growing in it for this season?

This is SOOO amazing! I’m a bit jealous of this large and bright space to work in. The windows and clear ceiling make such a difference and I can’t wait to see what it looks like when you’re done. I love it so far, especially the vintage desk and all the collected terracotta pots. Wow!
Oh my goodness, this is my dream! You did a beautiful job. I’ll be saving your post to reference when I someday can realize this dream.
Aw man, this just inspired me to create my own !! My poor husband is not going to like this! Thank you for this!! Pinning as I type!
That is an amazing build, and completely unique! I love it, and am totally inspired! You guys did a lot of work, but it will be so with it. Thank you for sharing!
The photography is amazing. I adore this so much
This post is so timely! I am a small farmer (I grow edible flowers, specialty and heirloom veg, and this year am putting in cut flowers–yikes! I’m so excited!!) and my hubby and I have been planning to build a lean-to greenhouse on the south side of our old metal shed. I’ve been dreaming about this for years. I’ve had a “temporary” plant room that has grown to take over much of our basement, and hubby is ready to move the plants out of the basement. I have been afraid of the cost, but I love the idea of using windows from the salvage store if I can find them. I’ll be following you closely as you post updates! THank you for this meaty, informative post, and many blessings on your flower farm business and family!! <3
That is so cool!!!! Sounds like we are both on the same journey. I am so glad it inspired you, it would definitely be amazing to have a place to grow your seedlings, I can’t recommend it enough! There are so many ways you can make them, and finding your resources over time will help with the overall investment. It is so fun to build, I can’t wait to hear more about your plans!